
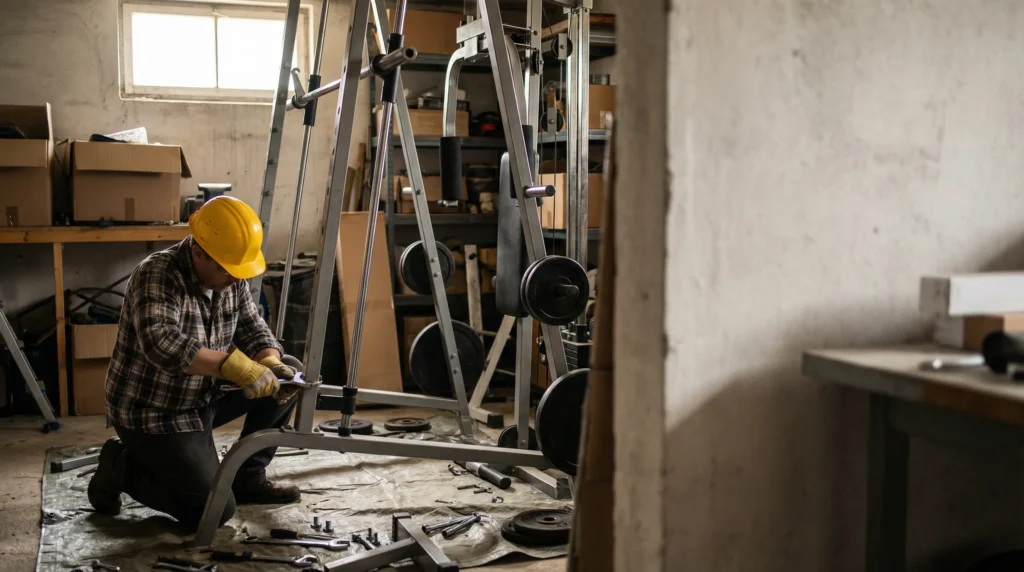
That massive Smith machine taking up half your garage isn’t just going to disappear on its own. Smith machine removal requires careful planning, proper tools, and serious attention to safety – these beasts can weigh anywhere from 300 to 800 pounds and stand over seven feet tall.
Whether you’re upgrading your home gym, moving to a new house, or simply reclaiming space, learning how to dispose of old Smith machine equipment safely protects both you and anyone helping with the job. One wrong move during disassembly can result in serious injury or property damage.
The process involves more than just unscrewing a few bolts. You’ll need to understand the machine’s construction, identify proper disassembly sequences, and coordinate disposal or donation logistics. Smith machines feature complex safety mechanisms and heavy-duty frames that require specific techniques to handle safely, as outlined in safety procedures for Smith machines.
For safely removing large home gym equipment, it’s important to follow proper guidelines not just for Smith machines, but for other heavy gear as well. Check out our tips on weight bench removal and treadmill removal for step-by-step guidance on handling bulky machines, and learn how to get rid of an old rowing machine safely. For complete home gym systems, our home gym system removal guide covers everything you need.
Before diving into the actual removal process, you’ll want to gather the right tools and prepare your workspace properly.
Prerequisites and What You’ll Need
Before you can safely remove and dispose Smith machines safely, gathering the right tools and understanding the scope of work ahead is essential. Most Smith machines weigh between 200-400 pounds and require methodical disassembly to prevent injury or property damage.
Essential Tools for Disassembly:
- Socket wrench set (metric and standard sizes)
- Allen key/hex wrench set
- Screwdriver set (Phillips and flathead)
- Moving straps or furniture dollies
- Work gloves for grip and protection
- Measuring tape for doorway clearances
Safety Equipment Requirements: According to safety procedures for Smith machines, proper protective gear includes steel-toed boots, back support belt, and safety glasses. These machines contain numerous springs, cables, and heavy components that can cause serious injury during removal.
Space and Assistance Planning: You’ll need at least 8 feet of clearance around the machine and a minimum of two people for safe handling. The ability to dispose Smith machine components varies by location, so contact your local waste management or recycling center beforehand to understand accepted materials and any associated fees.
Having everything ready streamlines the disassembly process and ensures you can tackle each component systematically.
Step 1: Preparing the Smith Machine for Disassembly
Before diving into the step-by-step Smith machine removal process, proper preparation sets the foundation for a safe and efficient disassembly. This crucial phase prevents equipment damage, protects your floors, and ensures you won’t get stuck halfway through the project.
Start by clearing the immediate area around your Smith machine. You’ll need at least three feet of workspace on all sides to maneuver components safely. Remove any weights, attachments, or accessories from the machine – these seemingly small items can become tripping hazards during the heavier lifting phases.
Next, lower all safety stops to their lowest position using the manufacturer’s adjustment mechanism. The safety stops play a crucial role in the machine’s structure, and positioning them correctly prevents binding during disassembly. If your machine has a barbell, secure it in the lowest safe position or remove it entirely if possible.
Document the setup by taking photos from multiple angles before you begin. This visual reference proves invaluable when you need to remove home gym equipment and want to remember how everything connects. These photos also help if you’re selling components separately.
Finally, lay out protective materials like moving blankets or cardboard on your floor path. This preparation step transitions smoothly into the actual disassembly process, where each component will need careful handling.
Step 2: Disassembling the Smith Machine
Once your Smith machine is properly prepared, the actual disassembly process requires a systematic approach to ensure safe removal. Start by removing all weight plates and storing them separately – this eliminates the heaviest components first and reduces strain on the frame during subsequent steps.
Next, focus on the barbell and guide rails. Most Smith machines feature a barbell that slides along vertical or angled rails with safety mechanisms. Carefully lift the barbell to its highest position and engage any locking mechanisms before attempting removal. The guide rail system typically connects to the main frame through bolted connections that require specific socket sizes to remove.
Safety stops are crucial components that must be handled with care during disassembly. According to The Importance of Smith Machine Safety Stops for Your Workout, these mechanisms are designed with precise tolerances. Document their positions and hardware before removal to avoid complications if you need to reassemble later.
When planning Smith machine disposal, breaking down these components systematically makes the process more manageable. This methodical approach also prepares you for the next critical step – completely unhooking the machine from any wall anchors or floor bolts, ensuring you can safely get rid of old Smith machine components without damaging your space.
How to Unhook a Smith Machine
With your Smith machine properly disassembled, the next critical step involves unhooking the machine from any fixed connections to your floor or wall. This process requires careful attention to the machine’s mounting system and electrical connections, if present.
Start by disconnecting any power sources if your Smith machine includes electronic components like digital displays or motorized features. Turn off the main power switch and unplug all electrical cords from wall outlets. For machines with battery backup systems, remove batteries to prevent accidental activation during the move.
Next, examine the base mounting system. Most Smith machines use either bolt-down anchors or heavy-duty floor plates for stability. Using your socket wrench set, carefully remove all mounting bolts that secure the machine to the floor. Keep these hardware pieces organized in labeled containers – you’ll need them if reinstalling elsewhere.
For wall-mounted safety systems, disconnect any wall anchors or cable attachments systematically. Safety procedures for Smith machines emphasize the importance of proper disconnection to prevent structural damage.
These tips for disposing heavy Smith machine components include checking for hidden connections behind decorative panels. Some units have heavy gym equipment removal requirements that include disconnecting ventilation systems or integrated sound equipment before final transport.
Once fully unhooked, your Smith machine components are ready for the crucial transportation phase.
Step 3: Transporting the Smith Machine Components
With your Smith machine properly unhooked and disassembled, the next crucial phase involves safely moving each component to your designated disposal or storage area. Safe Smith machine handling during transport prevents injury and property damage, making this step just as important as the disassembly itself.
Start by organizing components by weight and size. The heaviest pieces—typically the frame rails and counterweight system—require at least two people and proper lifting technique. Use furniture dollies or moving straps for components weighing over 50 pounds. For the vertical rails and crossbeams, wrap them in moving blankets to prevent scratches to your floors and walls.
Plan your route before lifting anything. Clear pathways of obstacles, open doors wide, and measure tight spaces like doorways or stairwells. The linear rail system, while disassembled, often remains quite long and may require angled maneuvering through standard doorways.
Consider renting a hand truck or appliance dolly for the heaviest components. Many hardware stores offer affordable daily rentals, which proves more economical than risking injury or hiring professional movers for this single task.
Once all components reach your staging area, you’re ready to explore proper disposal methods.
Step 4: Responsible Disposal of Smith Machine
After successfully transporting your Smith machine components to their destination, the final step involves responsible disposal or resale of your equipment. This phase requires careful consideration of environmental impact and local regulations governing bulky fitness machine disposal.
Explore resale options first before considering disposal. Smith machines retain significant value, and platforms like Facebook Marketplace, Craigslist, or specialized fitness equipment resellers often connect you with buyers seeking quality home gym equipment. Professional gyms upgrading their equipment may also purchase used Smith machines in good condition.
For disposal, contact your local waste management authority to understand specific requirements for large fitness equipment. Many municipalities offer special pickup services for oversized items, though fees typically apply. Some areas require advance scheduling or have designated drop-off locations for bulky items.
Consider recycling opportunities for metal components. Scrap metal dealers often accept steel frames and weight plates, potentially providing compensation while ensuring environmentally responsible disposal. Remove any non-metal components like plastic guards or rubber grips before taking items to recycling centers.
However, even with careful planning, disposal challenges can arise that require specific troubleshooting approaches.
Common Mistakes and How to Avoid Them
Even with careful planning, several critical errors can turn your Smith machine removal into a costly disaster. Understanding these common pitfalls will help ensure your home gym teardown proceeds smoothly and safely.
Rushing the disassembly process ranks as the most frequent mistake. Many people attempt to remove bolts and connections too quickly, leading to stripped threads or damaged components. Take your time with each step, especially when dealing with the safety stop mechanisms that require precise handling.
Inadequate lifting support creates another dangerous scenario. Smith machines typically weigh 300-500 pounds, yet people often attempt moves with insufficient help. Always recruit at least 2-3 strong assistants for the heaviest components, particularly the main frame and guide rods.
Poor pathway planning causes unnecessary complications. Before starting, clear all routes and measure doorways twice. What seems like an obvious path often reveals obstacles once you’re committed to moving heavy pieces.
Forgetting to document the assembly makes reinstallation nearly impossible. Take photos of each connection point and bolt configuration before removal. This simple step prevents hours of confusion later.
Limitations and Considerations
While following proper procedures on how to remove Smith machine safely significantly reduces risks, several inherent limitations remain that every homeowner should acknowledge before starting this project.
Physical limitations represent the most significant constraint. Smith machines typically weigh 300-500 pounds assembled, with individual components still reaching 100+ pounds after disassembly. Even with proper technique and equipment, individuals with back problems, joint issues, or limited upper body strength may find this task physically impossible without professional assistance.
Space constraints in many homes create additional challenges. Narrow doorways, tight staircases, or low ceilings can make safe removal nearly impossible, regardless of preparation. Standard doorways measure 32-36 inches wide, while some Smith machine components exceed these dimensions even when tilted or angled.
Time investment often exceeds expectations, with complete removal taking 4-8 hours for inexperienced individuals. This extended timeline increases fatigue-related injury risks and may require multiple days to complete safely.
Professional removal services remain the safest option when these limitations apply to your situation.
Key Smith Machine Removal Takeaways
Successfully removing a Smith machine requires careful planning, proper tools, and adherence to safety protocols throughout the entire process. The key to safe disposal of Smith machines lies in methodical disassembly, starting with safety stops and guide rods, followed by the barbell system and frame components. Remember that these machines can weigh 300-800 pounds when fully assembled, making teamwork and proper lifting techniques essential.
Documentation through photos before disassembly proves invaluable during reassembly, while protecting floors and walls prevents costly damage to your home. Whether you’re donating to local gyms, selling components online, or hiring professional removal services, always verify the structural integrity of each piece before disposal.
Take action today – assess your Smith machine’s condition, gather the necessary tools, and begin your safe removal process with confidence.


